If it is your first time trying to send and receive crypto, I’m sure you might have been overwhelmed by the interface.
Worry not! It happens to all of us, especially when we try something new.
But trust me when I say it is extremely easy to send and receive crypto. You just need to be a bit cautious and sure about what you’re doing.
So without further ado, let’s tell you how to send and receive crypto. For this guide, I will show you how to transfer cryptocurrencies from an external wallet to an exchange. Just so you know, almost every platform follows the same method (plus/minus a few steps).
Either way, the overall concept remains the same.
Oh wait! Before I tell you how to send and receive crypto, let me clarify a few terminologies that you’ll come across frequently once you start processing blockchain transactions.
Table of Contents
Behind The Scenes Of A Crypto Transaction
There’s too many things happening behind the scene of every crypto transaction that it is difficult to cover everything in one blog. However, I’ll give you a fundamental idea to help you better resonate with the process of transferring cryptocurrencies.
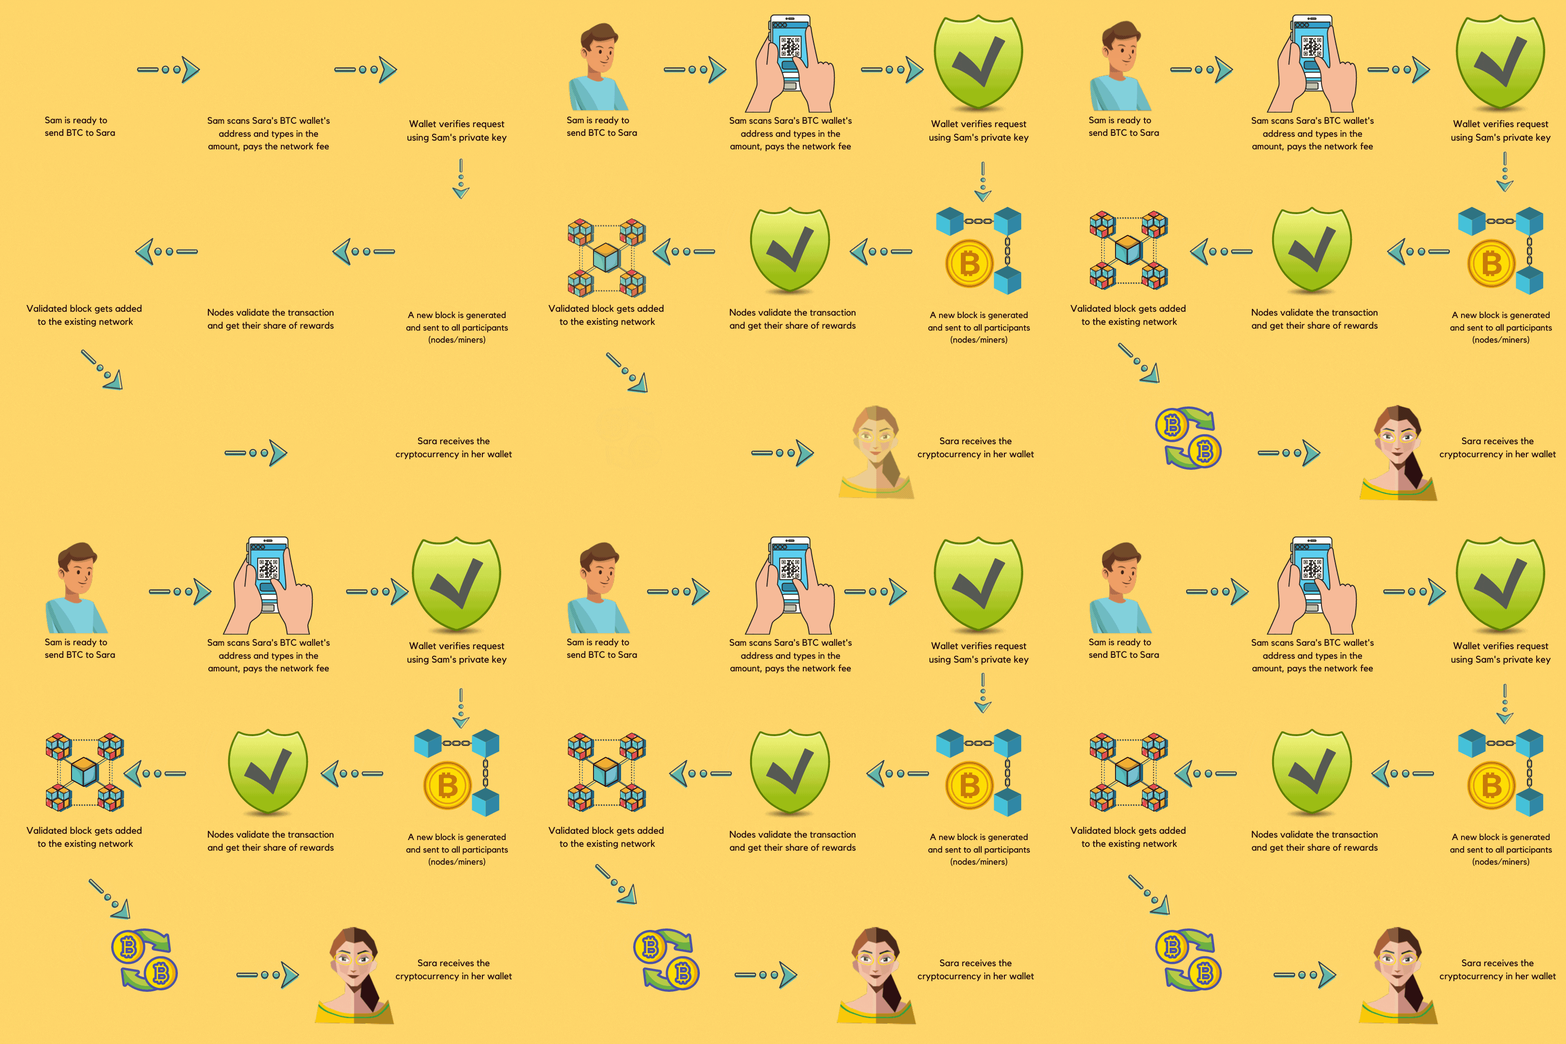
In blockchain, a transaction means the transfer of value from one address to another. Simply put, sender A sends bitcoin (BTC) to recipient B.
How does it work?
It uses public-key cryptography to ensure integrity of each transaction, where both the sender and the receiver have individual pairs of private and public keys. Note that the terms address and public keys are often used interchangeably.
Keep your private key safe because anyone who gets access to your private key also gets access to your digital wallet and all of your assets.
Here’s a visual graph to help you better understand the transaction process:

Things To Remember When Transferring Crypto
Whenever you send and receive cryptocurrencies, you’ll need to pay a gas fee cover the costs of your transaction. The “gas fee” varies significantly based on the network you choose. Ethereum network currently has the highest fee, sometimes more than the actual amount you’re sending. But there are several other networks like Polygon, Solana, and more, that allow you to send and receive crypto at the lowest-possible fee, sometimes free as well.
But wait! Don’t get confused between coins and tokens. While these words are often used interchangeably, there’s a difference between both.
“Coins” are native to a blockchain network and are usually distributed through mining. They can be used to store or transfer value. “Tokens”, on the other hand, are built on top of any existing blockchain network. They are usually distributed via ICOs (Initial Coin Offerings) and serve a variety of purposes.
In the world of cryptocurrencies, there are five different categories of tokens. These include:
- Platform Tokens – These tokens support dApps (decentralized apps) that are built on a blockchain network
- Security Tokens – These tokens are used to represent legal ownership of assets
- Transactional Tokens – Tokens that can be used as “unit of value” and exchanged for goods/services
- Utility Tokens – Tokens that are part of an existing protocol and can be used to access all of the services offered by the protocol
- Governance Tokens – Tokens that give you voting rights (and many other benefits) within its underlying network
Also, keep these things in mind:
- Firstly, understand that cryptocurrency transactions are irreversible. Once you process the transaction, it can only be refunded by the recipient. Hence, make sure to cross-check the wallet ID that you’re transferring crypto to.
- Second, remember that crypto transactions aren’t anonymous. While some effort is placed to hide your personal data, all blockchain transactions are recorded in the distributed ledger, which is accessible to all. So make sure that you aren’t using it to bypass compliance policies (won’t help, the cops would be at your doorstep).
- Finally, see to it that you select the correct token type and network type (more on this in the next section). Then review the network fee and the wallet ID one more time. If all seems fine, go ahead and process the transaction. Funds should be in your wallet depending on the network congestion.
Now that we’ve cleared the basics, let’s guide you on how to send and receive crypto from an external wallet to your Binance account. For this tutorial, we’ll check the process with Metamask as our external wallet.
Still not using Binance? Read my full review of Binance cryptocurrency exchange to learn the benefits it offers.
Send And Receive Crypto: The Process
Follow these steps to receive crypto in your Binance wallet.

- Login to your Binance account
- Click on “Wallet”
- Scroll to “Funding”
- Click on Receive

Once you do this, a new window will appear with a QR Code. On this window, click on “Select Currency”. Next, copy your wallet address for the specific currency.

Another way to do this is by visiting the Fiat and Spot balance under your Binance wallet. Then choose the token type. For instance, I would like to deposit some Cardano (ADA) in my wallet.

- Select ADA from the list
- Click on Deposit
- On the pop-up window, select the Network type (remember, gas prices vary depending on the network you choose). I’m choosing Binance Smart Chain (BEP20) as it is extremely cost-efficient)
- Once you select the network, you’ll see that your wallet ID has been generated. Copy it.

After you have copied the Wallet ID on Binance, go to your Metamask account and do the following:

- First, make sure that you have enough in your Metamask wallet to cover the gas fee (or you won’t be able to move forward)
- Select the token (ADA in this case) and the network type (BSC BEP20)
- Enter the amount of tokens you want to send (for instance, if you want to send 0.1 ADA, enter 0.1 in the field)

Now, check the gas price – this is what you’re willing to pay to the miners for validating your transaction (the higher you pay, the quicker your transaction gets processed). Also, check the gas limit (i.e., the maximum fee you’re willing to pay for this transaction). If you want to change the default gas fee, it is up to you (I leave it as is because the network suggested fee seems fine by me).
- Click on Next
- Click on Confirm
Depending on the gas fee and the network congestion, your transfer may take anything between 30 to 60 minutes, even higher.
You can check if the deposit has been successful by visiting the “Transaction History” section in your Binance account.

- Open Transaction History
- Check the status of the recent transaction under the “Status” column
- If it says “Confirming”, be happy, your transaction is valid and should reach your Binance wallet soon
That’s it! Now you’ve learnt how to send and receive crypto from Metamask to Binance.
Conclusion
Transferring crypto from one wallet to another isn’t complicated. Just make sure to select the correct token and network type on both ends (sender and receiver). Then copy the wallet ID from the recipient’s end and paste it on the sender’s interface. Check the gas fee and proceed with your transaction.
All you need to do is keep in mind that you need to first find the wallet ID of the recipient for the token you want to send. For ETH, choose the ETH Wallet ID, for BNB, choose the BNB wallet ID, so on and so forth.

